Be a Wind Warrior
About the Activity
Take a load off! As energy superheroes, you and your friends have just moved into the Superhero Hideout on Energy Island, but you have a problem! Your superhero supplies are too heavy to move from the underground garage and into the hideout. Create a new way to lift objects by using the wind. Are you up to the challenge?
Do you want to learn more about Energy Island? Explore the 4-H 2023 STEM Challenge, check out the Power Protectors STEM Challenge kit, and learn more about the Power Protectors.
Learn More About STEM Challenge
Buy Your 2023 STEM Challenge Kit
Materials
Here are the supplies you will need:
Cardstock or construction paper (Thicker works better)
String (Cotton or twine is best)
Paper clips
Rubber bands
Scissors
Tape
Ruler
Large disposable cups (recommend 16 oz.) or round oatmeal container
Small disposable cups (recommend 6 oz.)
Large straws (Specialty)
Small straws (Unbendable preferred, but a wood skewer or pencil will work; Specialty)
Hole punch (Optional)
A box fan or blow dryer (Optional)
Crayons, markers, or other materials to decorate the windmill (Optional)
Stopwatch or timing device (Optional)
Pennies (Optional)
Activity Steps
This engineering challenge shows you how wind can be converted into energy and used to move objects from one place to another! In this activity, you will harness wind power to lift supplies into the Superhero Hideout.
You will create and use a simple machine to lift the supplies into the Superhero Hideout. A simple machine is a device that can be used to change the direction or power of a force on an object. There are six types of simple machines:
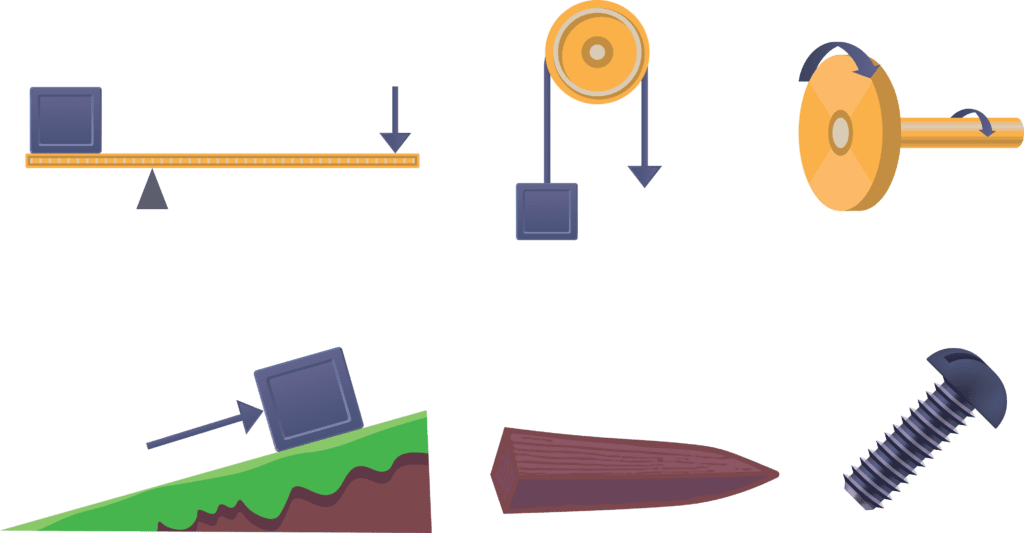
- Inclined planes
- Levers
- Pulleys
- Wedges
- Wheel and axles
- Screws
Windmills and wind turbines are excellent examples of simple machines. They are known as wheel-and-axle machines. The wheel or blades are connected to a rod or axle. When the wheel catches the wind’s energy with its blades, the blades spin around the axle. This spinning motion transfers the force from the wind to the axle, turning the wind power into mechanical energy! This mechanical energy can then be used to do useful work, like moving heavy objects or generating electricity! The wheel-and-axle machine is the foundation of many mechanical inventions, like bicycles and cars.
In this activity, you will use a pulley and wheel-and-axle to build a windmill that can lift supplies to the Superhero Hideout.
Make a paper square
Use the ruler to measure a 6.5” by 6.5” square on your cardstock or construction paper. Then cut it out.
 Did you know?
Harnessing wind power isn’t a new idea. In fact, wind has been used as an energy source since at least 3,000 years ago in Persia (modern-day Iran) in the form of windmills. Over time, people improved the original windmills and turned them into the powerful wind turbines you see today on Energy Island.
Cut toward center
Mark the center of your square, and cut from the corners diagonally toward the center of the square, stopping about 1.5” from the center point.
Make a hole in the middle
Use scissors or a hole punch to make a hole in the center and at the end of every other one of your 8 corners. The hole should be large enough for the small straw to fit into.
Put straw though middle
Push the small straw through the center of your square, and then bend—don’t fold—each of the corners onto the straw.
Finish your pinwheel
Secure the front and back of the pinwheel with tape, a paper clip, or rubber bands to keep the pinwheel together. There should be about an inch of space between the front and back of the pinwheel.
Cut the large straw
Cut the large straw so that it is equal in length to the bottom of your large cup, and secure it there using tape.
Insert the small straw
Slide the end of your small straw through the large straw on your base. There should be about 1.5 inches of the small straw that extends past the base. You can trim the small straw if needed.
Turn the small cup into a bucket
Take your small cup and cut two holes on opposite sides, and tie a small piece of string between the two holes, creating a sort of bucket handle.
Clip the small straw
Place tape or a binder clip on the end of the small straw to keep the pieces together.
Finishing touches
Secure one end of your string to the end of the small straw, and tie the other end to the small cup handle.
Add wind
Blow on your pinwheel, and watch it lift the small cup. This step may work better if you have a fan available to blow on the pinwheel.
Did you know?The oldest type of windmill had a horizontal fan and was used in Persia, China, and Europe. Windmills with vertical fans are much more common.
Load it up!
Add some pennies, paper clips, or other small weights to your cup, one at a time. What is the maximum amount you can lift?
Did you know?Although there are many versions of the engineering design process, 4-H uses this model in the STEM Challenge:
- Ask
- Imagine
- Plan
- Create
- Test
- Redesign
The engineering design model will come in handy while completing this activity as well as the 4-H 2023 STEM Challenge.
Redesigning can be used in many different settings. For example, if you try a new cookie recipe and you don’t like how it turns out, you can redesign it by adding or removing ingredients and then test the recipe again. Redesigning is an important step in many things we do—and in this case, it’s delicious!

Redesign Time
When an engineer or inventor creates a new device, they usually don’t get it exactly right the first time. One of the most important steps of engineering is redesign. After you have built a basic windmill lift, it will be time to make it better! Look at your windmill with a critical eye. What could be improved to make it function better?
Here are some questions to ask yourself:
- What could I change to enable the windmill to lift more supplies at a time?
- Is there anything I could do to make the windmill complete the work faster?
- Is the windmill sturdy enough to stand on its own? How can I make it more sturdy or durable?
Once you have brainstormed ideas, it is time to redesign. Make a second windmill prototype, using your ideas for improvement. Then test it, comparing your second windmill lift to your first. Is your new machine sturdier or more durable? Can it move faster or lift more?
Test Your Knowledge
Reflection Questions
Take a moment and reflect on these questions:
What other simple machines do you use in your life? How do they make your life easier?
What other tasks could a windmill lift help with? What other types of work can a windmill do? (Learn about turning wind into electricity through the 2023 4-H STEM Challenge.)
How do you use the design process in your life? How can this help when something doesn’t work the way you want it to?
Investigate and Explore
Explore the two options below to take what you’ve learned about wind power to the next level.
- Take a virtual tour of a wind turbine on this screen by selecting and dragging around the image.
- Explore a related CLOVER activity, such as Make a Wind Vane
Share it!
Share what you learned with your family. Then, set a goal to visit wind turbines or a wind farm around your home and/or participate in an in-person tour.
Career Connections
As we look to the future, wind is likely to make up a greater percentage of our power production. It’s considered a renewable energy source, unlike fossil fuels like coal.
There are many careers related to renewable energy. Consider setting a goal to research professions that sound interesting to you:
- Energy Engineers
- Environmental Scientist
- Solar Panel Installers
- Environmental Policy Makers